8 Easy DIY Tricks to Fix Orange-Tinted Wood Furniture
I’ve been there—you buy a beautiful wooden table or cabinet, excited to show it off, only to notice that over time it starts to glow… with the wrong kind of orange. That warm amber tone that looked charming in the showroom now feels overwhelming, cheapening the look of your carefully chosen piece. I’ve spent years working with wood finishes, experimenting with refinishing techniques, and helping friends salvage heirloom furniture, and I know exactly how frustrating it can be.
In this guide, I’m going to walk you through eight proven ways to remove that stubborn orange tone from your wood furniture. I’ll share practical tips that actually work, whether you’re looking for a gentle touch-up or a full refinishing project. By the end, you’ll not only understand why your wood turned orange in the first place, but you’ll also have clear, actionable steps to bring it back to the color you want—without guessing or risking damage.
Before we dive in, I want you to remember this: the method you choose depends on your piece, the wood type, and how intense that orange tone is. Think of this as your toolkit—you’ll pick the right tool for the job, and I’ll guide you every step of the way.
Why Does Your Wood Furniture Turn Orange in the First Place?
If you’ve ever stared at a once-beautiful piece of furniture and wondered, “Why does it look so… orange?”—you’re not alone. I’ve seen this happen countless times, and understanding the reason behind it makes all the difference before you start any fix.
Here’s what usually causes that unwelcome glow:
- Natural ageing of finishes: Over time, varnishes and oils oxidize. Sunlight and oxygen slowly darken the surface, creating a warmer, amber-like cast. I’ve found that even high-quality finishes eventually show this effect.
- Resinous woods like pine: Certain woods are naturally richer in resin, which can give them a golden-orange hue. Add sealants into the mix, and that glow intensifies.
- Yellowing finishes: Some old sealants and finishes tend to yellow as they age or soak into the wood grain, which can exaggerate the orange tone.
Before we jump into solutions, here’s a quick checklist to figure out what’s happening with your piece:
- What type of wood do you have? Solid pine behaves very differently than oak or walnut.
- What finish is currently on the furniture? Oil, varnish, lacquer—all age differently.
- How much light exposure has it had? South-facing sunlight will accelerate ambering.
Understanding these factors helps you pick the right method instead of applying a generic fix that might not work—or worse, damage the piece. If you want a deeper dive into why finishes yellow and how to slow it down, this Martha Stewart guide on removing orange tones explains it clearly.
How To Assess Your Piece (Before You Start)
Before you grab sandpaper or chemicals, I always recommend taking a careful look at your furniture. Rushing in can ruin even the nicest piece, so let’s make sure you’re prepared.
Here’s what I do before every project:
- Identify the wood type and finish: Solid wood, veneer, pine, oak—knowing exactly what you’re working with matters. Different woods react differently to sanding, bleaching, or toning. If you’re also curious about restoring hardwood floors, check out these 3 genius ways homeowners are restoring hardwood floors—many of the same techniques can help with furniture refinishing.
- Determine the depth of the orange tone: Is it just the surface finish, or has the wood itself taken on that hue? If it’s only the topcoat, you can often fix it with lighter methods.
- Check for damage or coatings: Old lacquer, scratches, or water stains will affect which method works best. Always test a hidden spot first—it saves heartbreak later.
- Safety and environment checklist: Ventilation, gloves, drop sheets—some methods involve chemicals like bleach or strippers, so protecting yourself and your floors is essential.
Taking these steps may feel like extra work, but trust me, it pays off. You’ll know exactly what you’re dealing with and avoid unnecessary mistakes.
Method 1 – Light Sanding + Clear Water‑Based Finish
If you’re dealing with a mild orange tone, this is often my go-to approach. It’s gentle, effective, and doesn’t require a full refinishing project. I like it because it preserves the natural beauty of the wood while taking the harsh edge off that orange glow.
Here’s how I do it:
- Start with 220-grit sandpaper to lightly scuff the surface. This removes the top layer of oxidized finish and helps the wood accept a fresh coat. Go slow—you’re not trying to strip the wood, just smooth it out.
- Clean off all dust with a tack cloth or damp rag. The cleaner the surface, the better the finish will adhere.
- Apply a clear water-based topcoat. These finishes won’t amber over time like oil-based alternatives, so your furniture stays true to its intended color.
- Pro tip: Always test a small, hidden area first. You’ll see how the wood reacts and avoid any surprises.
I like using this method because it’s low-risk and gives you immediate results. You’ll notice the orange tone softening after just one light coat, and it’s satisfying to see the natural wood shine again.
Method 2 – Toner or Blue/Green Wash to Neutralise Orange Undertones
Sometimes sanding alone doesn’t do enough, and that’s when I turn to colour correction. Blue or green toners work beautifully because blue sits opposite orange on the colour wheel—it’s a simple trick that really balances out warm undertones.
Here’s how I handle it:
- Choose a blue-green dye toner or wash coat suitable for wood. Start light; you can always build it up.
- Apply gently following the wood grain using a soft cloth or brush.
- Wipe off any excess immediately so you don’t overdo it—you want to tone down orange, not create a grey or green cast.
- Seal with a clear topcoat once you’re happy with the colour.
When to use: If you want to keep the natural wood look visible but reduce the orange glow.
Caution: Go slow. Over-toning can easily push the wood into an unnatural shade.
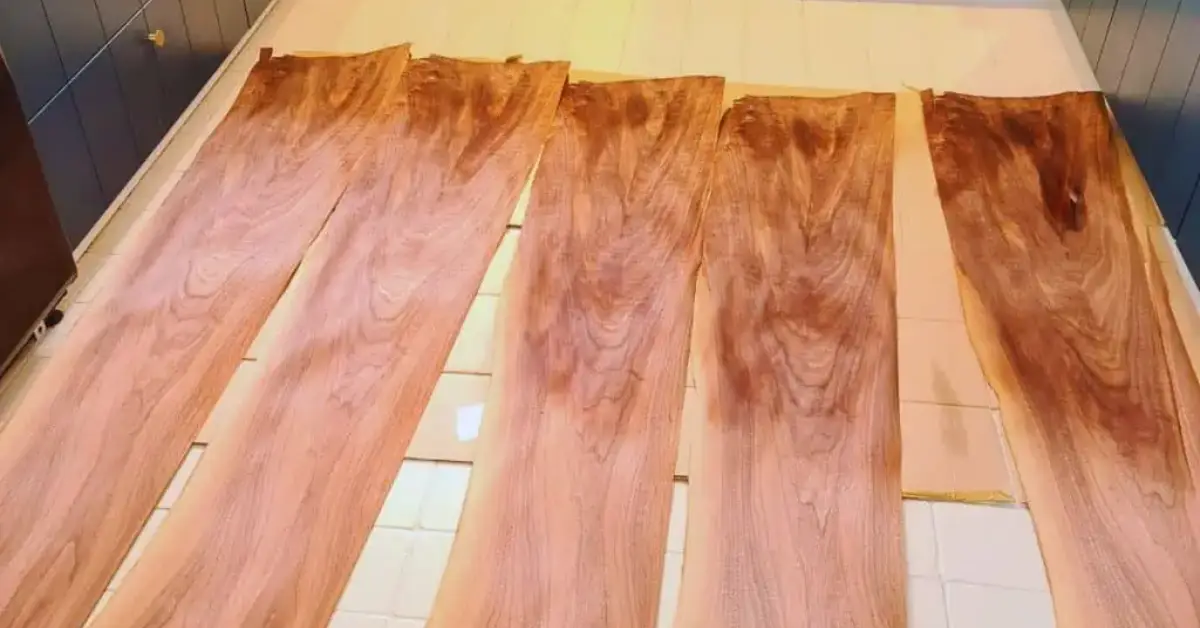
Method 3 – Stripping Finish + Oxalic Acid (for Stains)
Sometimes the orange isn’t just on the surface—it’s baked in under layers of old varnish or caused by water and iron stains. I’ve found that stripping and treating the wood can reset it almost completely.
Here’s my process:
- Remove hardware and clean the surface with TSP or a gentle wood cleaner. Follow up with mineral spirits to remove any residue.
- Sand gradually, starting coarse (120 grit) and moving finer (150 → 180 → 220 grit) until you reach the raw wood.
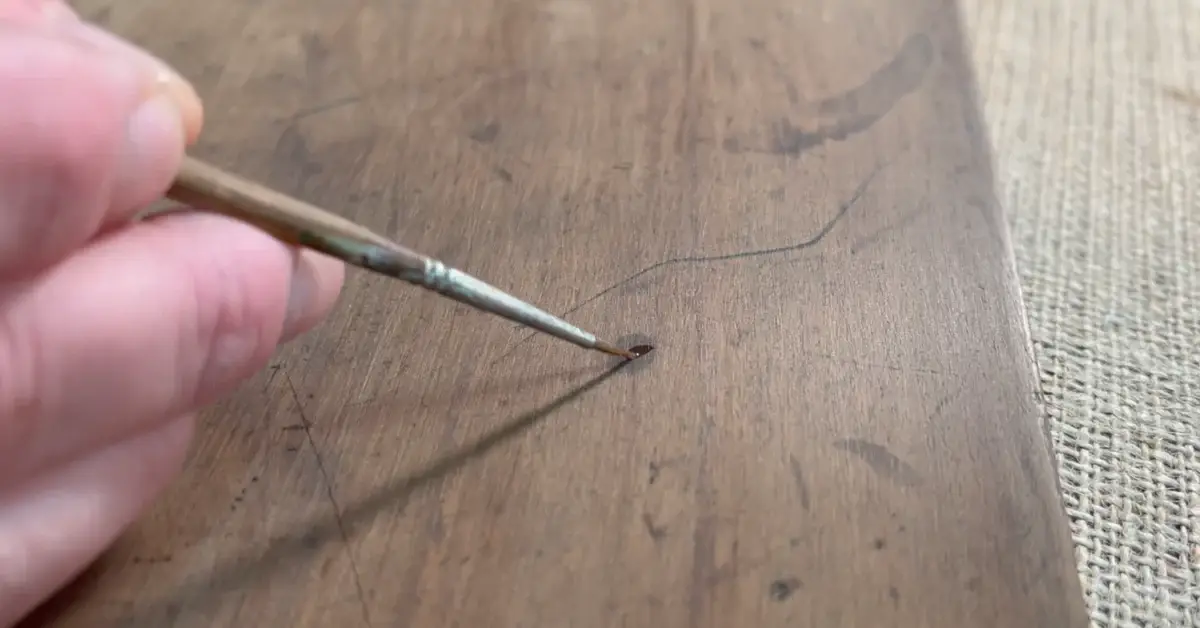
- Treat stubborn stains with oxalic acid—it’s excellent for water marks and iron discoloration.
When to use: Ideal for furniture where heavy varnish or long-term ambering is the main culprit.
Safety first: Gloves, masks, and ventilation are essential here. You’re dealing with chemicals that can irritate skin and lungs.
Method 4 – Two‑Part Wood Bleach to Lighten & Neutralise Deep Orange/Red Tones
For really stubborn orange or red tones, I go for a two-part wood bleach. It’s often overlooked in many blogs, but when done right, it can transform even the most saturated wood.
Step by step:
- After stripping and sanding, apply Solution A, then Solution B, following the product instructions carefully.
- Neutralize the wood with a vinegar + water solution and let it fully dry.
- Sand lightly with fine grit to smooth the surface.
When to use: Best for raw wood that still has strong orange or red tones and you want a lighter, more natural finish.
Caution: Heavy-duty chemicals require care. Always test a hidden area first, and be aware that veneers may react differently than solid wood.
Method 5 – Paint‑Wash or White‑Wax Treatment (When You’re Fine With a Slight Change in Look)
If subtle color change isn’t a problem, paint-washes and white-wax techniques can turn orange wood into something bright and fresh. I often use this method on older pine pieces that could use a modern touch.
Here’s how I do it:
- Mix water with off-white or chalk paint in a ratio of about 3 parts water to 1 part paint, and apply a light wash over the bare wood. I usually check guides like the one on Nurifurnishings for inspiration—they show exactly how a wash can reduce red and orange tones while keeping the wood grain visible.
- Alternatively, apply a white wax liming technique for a soft, Scandinavian-inspired look.
When to use: Perfect if the orange is intense and you’re okay with subtly shifting the aesthetic.
Bonus: Gives a bright, airy feel that works beautifully with lighter interiors, especially on pine.
Method 6 – Restain/Colour Over with a Blue‑Undertone Stain
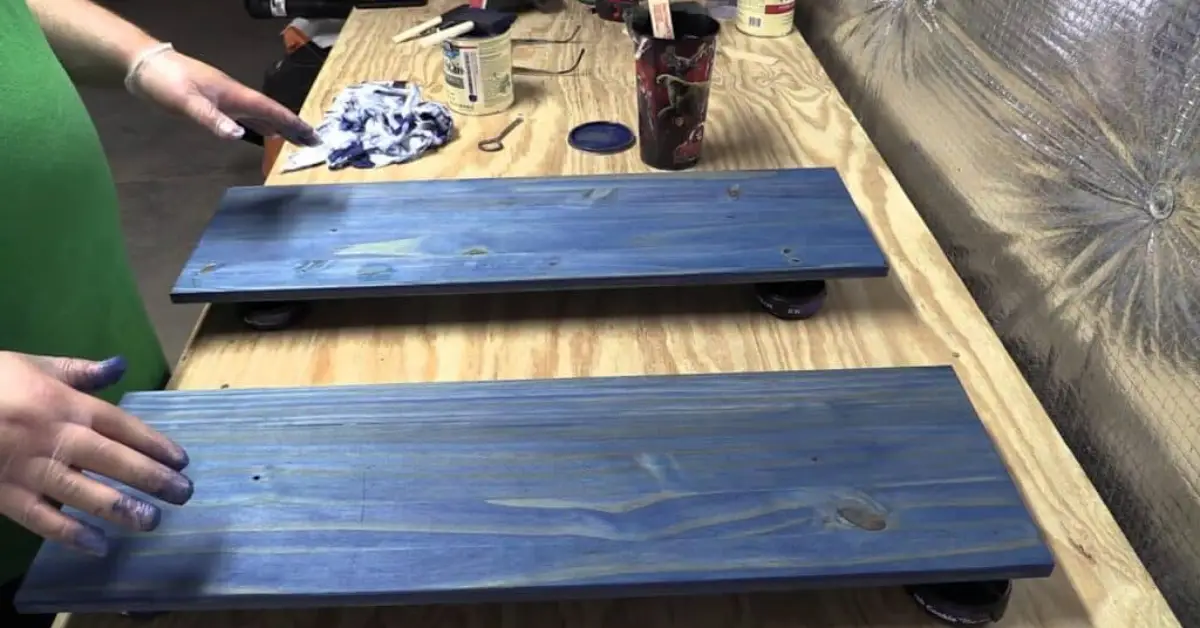
Sometimes, subtle neutralisation isn’t enough, and the easiest solution is to change the wood’s tone entirely. A blue-undertone stain can counteract the orange effectively and give your piece a fresh, clean look.
Here’s how I usually approach it:
- Choose a blue-undertone stain that complements your wood type.
- Clean and sand the piece to ensure the new stain adheres evenly.
- Apply carefully, following the wood grain for smooth, consistent results.
When to use: If you’re comfortable with a noticeable color change and want to eliminate the orange cast completely, rather than just tone it down.
Tip: Test on a hidden area or scrap piece first so you’re confident with the color outcome.
Method 7 – Go Painted or Fully Covered Finish (When Natural Tone Isn’t Critical)
Sometimes, the simplest solution is to embrace a painted or fully covered finish. I’ve used this method for pieces where the natural wood tone isn’t important or the wood itself isn’t particularly attractive.
Here’s my process:
- Strip, sand, and prime the surface.
- Apply either a solid paint or a semi-opaque stain/finish to completely cover the wood.
When to use: Perfect for furniture with structural issues, unattractive wood, or when preserving the natural color isn’t a priority.
Benefit: This method completely bypasses the orange problem and gives you a fresh canvas.
Considerations: Painting or full coverage can affect resale or antique value, and it requires more time and materials than simple refinishing.
Method 8 – Prevention: How to Stop Orange Tone from Returning
Once you’ve corrected the color, keeping it that way is key. I always focus on prevention, because it’s far easier to protect your wood than fix it again.
Here’s my checklist:
- Use water-based finishes or topcoats, which are less prone to ambering over time. Studies show that UV exposure and oxidation accelerate yellowing in wood surfaces, which is exactly what creates those orange tones.
- Avoid direct sunlight where possible; UV rays intensify ambering.
- Rotate furniture, use blinds, or add window filters to reduce exposure. For long-term protection, you can also explore these 8 proven secrets to save your vintage pieces from sun, humidity, and bugs, which cover additional ways to preserve wood and prevent unwanted color changes.
- If starting fresh, choose lighter wood species or the proper stain/finish to minimize orange undertones.
- Maintain your furniture with regular dusting, cleaning, and occasional re-coating.
Following these steps helps your wood stay true to the color you want and keeps your furniture looking its best for years to come.
Choosing the Right Method for Your Piece
By now, you’ve got a toolbox full of ways to tackle that stubborn orange tone in your wood furniture. The key is figuring out which method fits your piece, your goals, and your comfort level. I always start with a quick mental checklist:
- Is the furniture solid wood or veneer?
- How intense is the orange tone?
- Do you want to keep the natural wood look, or are you okay changing the color entirely?
- How much time, budget, and effort are you ready to invest?
Once you’ve answered these questions, it’s easier to match the right approach—whether that’s gentle sanding, a subtle toner, a full bleach, or even a fresh paint or stain.
A few tips I always share:
- Test a small area first. It saves heartbreak and ensures the method gives the effect you want.
- Preserve the value, especially if your piece is vintage or antique. Sometimes a subtle approach is better than a heavy-handed one.
- Think about long-term maintenance and prevention, so your efforts last. And if your furniture project is part of a home office makeover, don’t miss these 10 genius ways to make your home office more private and peaceful—a well-designed space can make all the difference in enjoying your restored furniture.
I’d love to hear about your furniture projects! Share your situation in the comments below, or visit my website Build Like New for more step-by-step guides, tips, and inspiration on restoring and beautifying wood furniture. Your story might even help someone else facing the same orange-tone challenge.
Disclaimer: The methods described here involve sanding, chemicals, and finishing products. Always follow safety instructions, test on a hidden area first, and use proper protective gear. Build Like New is not responsible for damage to furniture or injury resulting from the use of these techniques.