8 Smart Upgrades to Give Your Wood Cabinets a Fresh, Modern Look
I’ve spent years helping homeowners breathe new life into their kitchens, and one thing I’ve learned is this: outdated wood cabinets don’t have to mean a full remodel. You can transform them into something modern, fresh, and even stylish without tearing everything out. I know the thought of sanding, painting, or picking the right hardware can feel overwhelming, but with the right approach, it’s actually exciting—and surprisingly doable.
In this article, I’ll walk you through eight practical ways to update your wood cabinets—from quick hardware swaps to design-savvy tweaks that make your kitchen feel completely new. These aren’t just trends I’ve seen online; these are methods backed by design experts, real-world examples, and even social media inspiration that homeowners like you are actually using. By the end, you’ll have a clear plan that fits your style, budget, and timeline.
Before we dive in, I want you to know this: you don’t need to replace everything to make a statement. Little changes can have a big impact, and I’ll show you exactly how to do it.
Why updating wood cabinets makes sense
I’ve seen too many kitchens where people think the only solution for outdated wood cabinets is a full replacement. The truth? Most of the time, that’s overkill. Updating what you already have can save you a ton of money, reduce waste, and still give your kitchen a fresh, modern look. Let’s break it down so you can see why it’s worth considering.
Signs your cabinets look outdated (grain, color, style)
You might not even notice at first, but certain features scream “old-fashioned.” Look for:
- Grain patterns that dominate the room: Heavy oak or dark wood with pronounced grain can feel stuck in the past.
- Color tones that feel dull or dated: Yellowed wood or orange‑red hues can clash with modern appliances or paint schemes.
- Style cues that aren’t trendy anymore: Raised panels, ornate moulding, or bulky trim that make cabinets look heavier than they are.
Spotting these early helps you decide if an update is enough or if you should plan for bigger changes.
Cost and time advantages of updating vs full replacement
Here’s where updating really shines:
- Budget-friendly: Repainting, refinishing, or swapping hardware can cost a fraction of what replacing all cabinets would.
- Faster turnaround: While a full replacement might take weeks, a targeted update can often be done in a weekend or two.
- Less disruption: You don’t have to move appliances, plumbing, or deal with construction mess.
Situations where full replacement is better
That said, there are moments when updating won’t cut it:
- Cabinets are warped, sagging, or water-damaged.
- Hinges and frames are structurally compromised.
- Your design goals require a completely different layout.
Knowing the difference helps you save money and avoid frustration.
Way 1 – Update the cabinet hardware for an instant modern lift
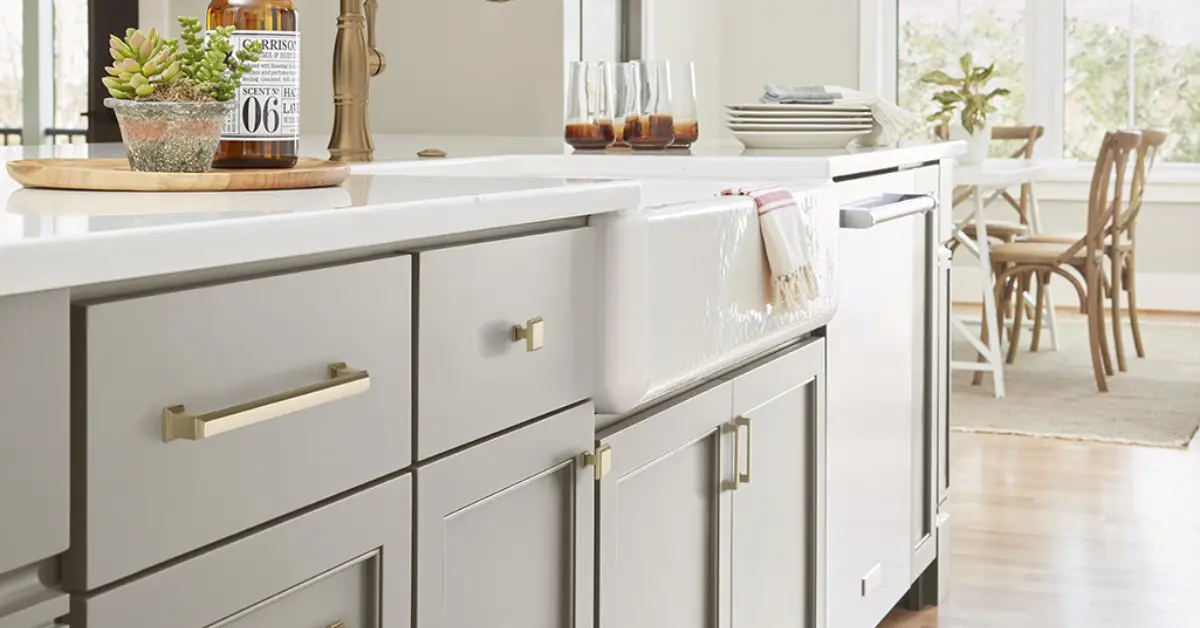
One of the easiest ways I’ve found to modernize wood cabinets is by changing the hardware. It’s a small investment with a huge visual payoff, and it’s something you can do yourself with just a few tools.
Choosing modern finishes (matte black, brushed brass, mixed metals)
The finish you pick sets the tone:
- Matte black: Sleek, minimalist, works on both light and dark woods.
- Brushed brass or gold: Adds warmth and a subtle luxury feel.
- Mixed metals: Pair knobs and handles in different finishes for a trendy, layered look.
Think about the overall style of your kitchen and the kind of vibe you want—this choice is the easiest way to modernize instantly. If you’re looking for inspiration and expert-approved ideas to transform your kitchen with hardware, take a look at 10 Best Kitchen Cabinet Hardware Ideas to Transform Your Kitchen in 2025.
Matching hardware style to cabinet doors and layout
Not all knobs and handles fit every cabinet:
- Flat-panel doors: Simple bar pulls or square knobs look best.
- Raised-panel doors: Rounded or decorative pulls complement the depth.
- Large kitchen layouts: Using consistent hardware throughout avoids a cluttered feel.
DIY vs hiring a professional: alignment & tools
You don’t need a contractor, but a few tips make your life easier:
- Use a template to ensure knobs and pulls line up perfectly.
- Drill slowly and double-check measurements—misaligned holes are the most common mistake.
- If you’re unsure or working with tricky cabinetry, hiring a pro can save frustration.
Way 2 – Refresh the finish: Paint, Stain or Re‑finish
If there’s one step that can completely transform your cabinets, it’s the finish. I’ve worked with homeowners who were shocked at how fresh their kitchens felt after just a coat of paint or a new stain. The key is knowing which approach works best for your space and style.
Paint vs stain – pros and cons
- Paint: Perfect for creating a clean, modern look. It covers imperfections well and lets you play with color trends.
- Stain: Highlights the natural wood grain and warmth. Great if you love that authentic wood feel but want a refreshed, updated tone.
- Tip: If your wood has heavy orange or red undertones, a neutral or cooler stain can instantly modernize it.
Modern colour and stain trends for wood cabinets
- Soft neutrals: Cream, gray, or greige create a timeless backdrop.
- Bold tones: Deep navy or forest green adds drama without feeling dated.
- Two-tone cabinets: Light upper cabinets with darker lower ones are still trending and add depth to your kitchen.
Surface prep checklist (sanding, priming, dealing with undertones)
Before you apply anything, prepping is everything:
- Sand lightly to remove the old finish and smooth rough spots.
- Use a high-quality primer, especially if painting over dark wood.
- Test your stain or paint on a small area to check how the wood undertones react.
- Protect hardware and surrounding areas with painter’s tape.
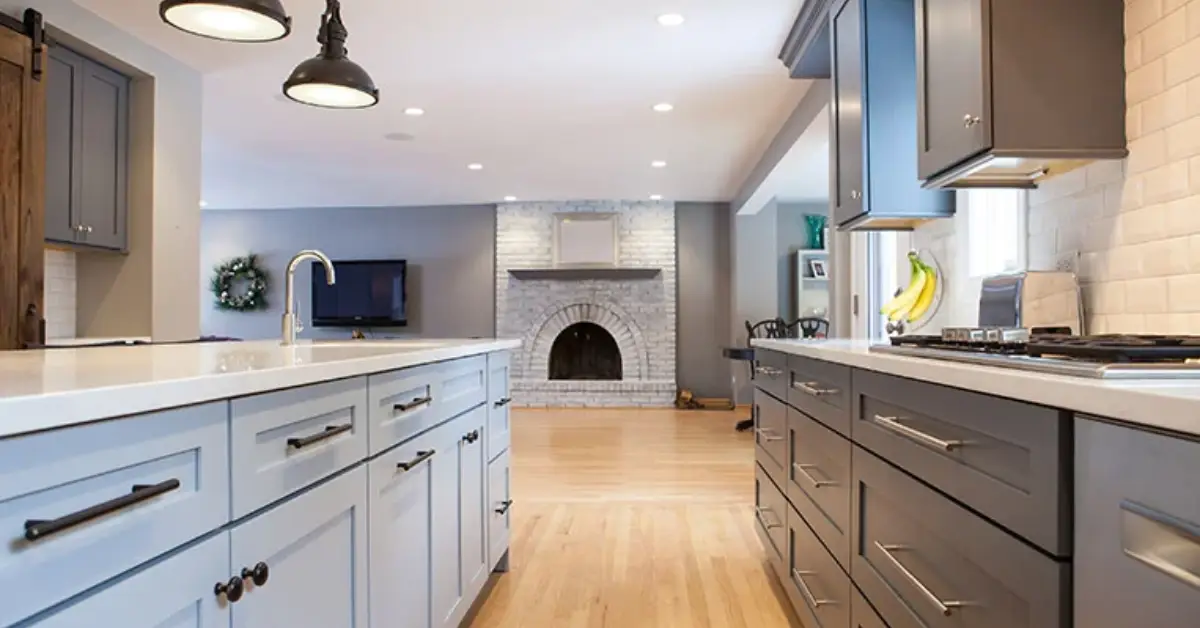
Way 3 – Introduce contrast or two‑tone cabinetry
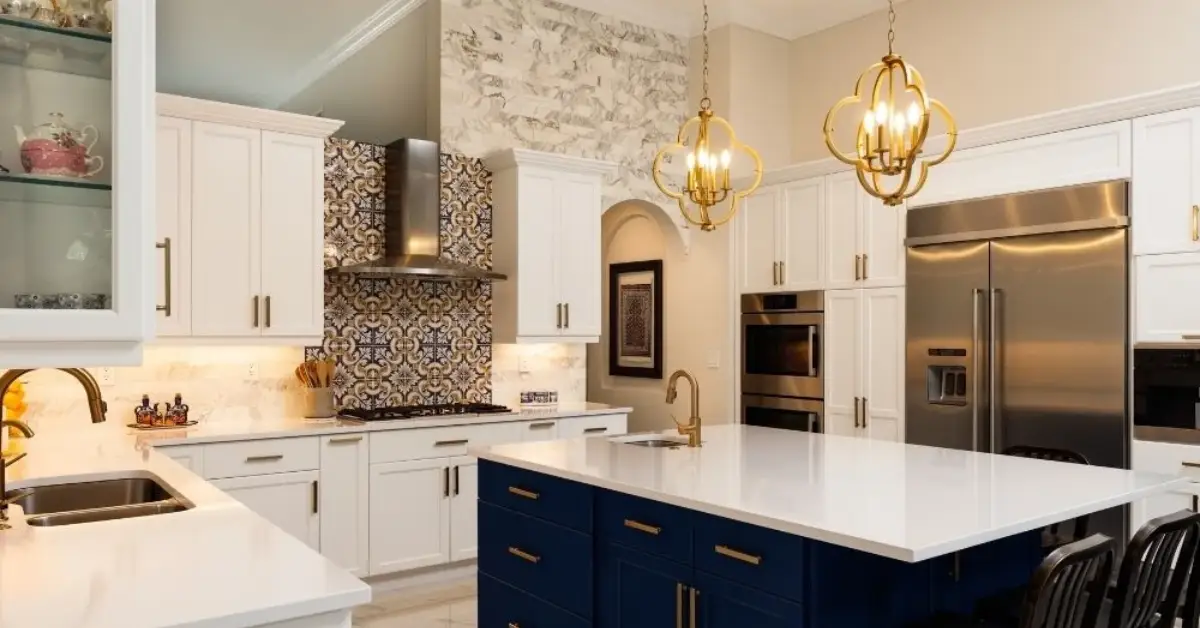
One of my favorite ways to make old cabinets feel modern is by adding contrast. Two-tone cabinets create depth and dimension, making your kitchen look fresh without a full renovation. You don’t need a designer to pull this off—you just need a few simple rules and some planning.
Upper vs lower cabinet color splits
- Light on top, dark on the bottom is the most classic approach—it brightens the space while grounding it.
- If your kitchen is small, using a lighter color on the lower cabinets can actually make the space feel more open.
- Always consider how the cabinet colors will work with your countertop and backsplash.
Mixing wood tones with painted elements
- Pairing natural wood on the bottom with painted upper cabinets adds warmth without feeling dated.
- Avoid too many competing colors—stick to 2–3 complementary shades.
- You can also mix finishes: matte, satin, or semi-gloss for subtle variation.
Visual examples and cost implications
- Two-tone cabinets don’t require replacing all the cabinetry, which keeps costs down.
- Small sections of contrasting color, like an island or pantry, can make a big impact.
- Check inspiration from Real Simple’s two-tone kitchen ideas—they have real-life examples of homeowners successfully blending wood and paint.
By the time you’re done choosing your color split and finishes, your cabinets will feel like a designer did the work—but without the huge price tag.
Way 4 – Upgrade surrounding elements (backsplash, countertop, lighting)
I’ve noticed that even beautifully updated cabinets can feel out of place if the surrounding elements are stuck in the past. Sometimes, all it takes is a few thoughtful changes to the backsplash, countertop, or lighting to make your whole kitchen feel modern and cohesive.
Choosing backsplash and countertop to complement cabinets
- Pick a backsplash that enhances your cabinet finish rather than competing with it. Neutral tiles or subtle patterns usually work best with wood tones.
- Countertops don’t need to be brand new to look fresh—a quartz or granite pattern that coordinates with your cabinet color can modernize the space instantly.
- Consider the balance of color and texture; if your cabinets are bold, keep the backsplash simple, and vice versa.
Under-cabinet and inset lighting to highlight cabinetry
- Lighting isn’t just practical—it draws attention to your updated cabinets.
- LED strip lights under cabinets or inside glass-front doors add depth and create a warm ambiance.
- Even small changes like swapping outdated bulbs for daylight LEDs can make a big difference in how your cabinets appear.
Updating mouldings, valances, or bulkheads
- Removing bulky valances or decorative mouldings can instantly give older cabinets a cleaner, modern look.
- Adding subtle trim or crown moulding can also elevate the design without making it feel heavy.
- Think about these elements as finishing touches that frame your cabinets and make them stand out.
By paying attention to these surrounding elements, your cabinets won’t just look new—they’ll feel like part of a fully updated, designer kitchen.
Way 5 – Add texture and architectural detail
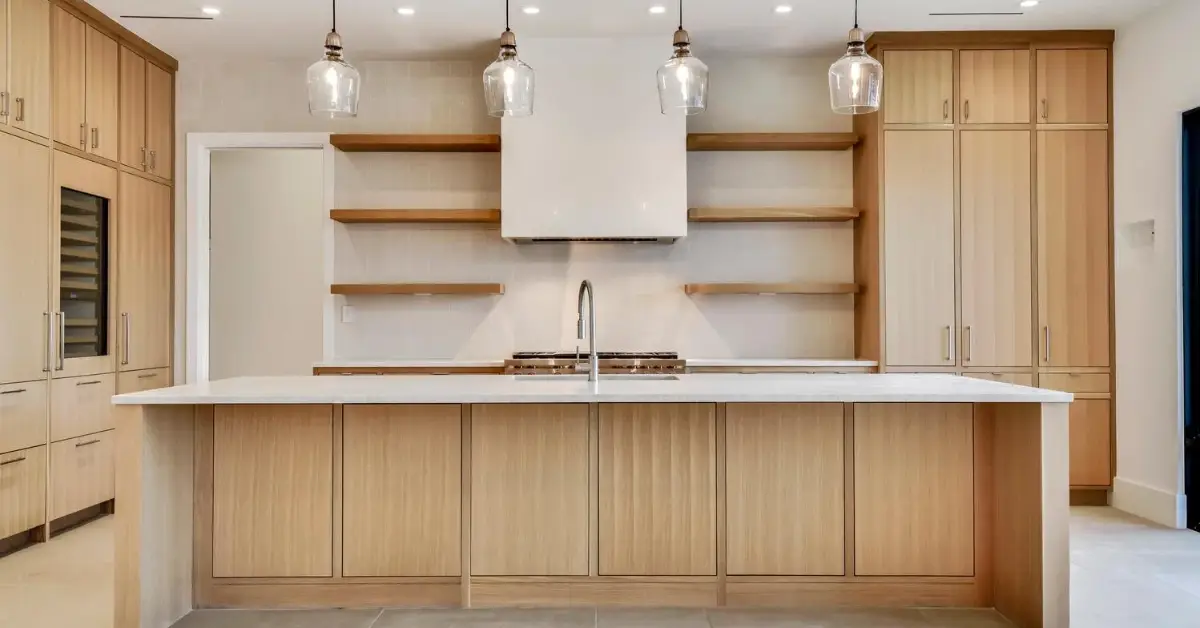
If you really want your cabinets to feel custom and modern, adding texture or architectural details can make a huge difference. I’ve seen kitchens with basic updates suddenly look like a professional designer touched them—just because the homeowners added subtle trim or paneling.
Adding clean moulding or trim
- Installing simple crown moulding can elevate the cabinets without overwhelming the space.
- Fluted or reeded trim adds sophistication and catches the eye without heavy ornamentation.
- Even adding a small decorative toe-kick or baseboard detail can make cabinets look built-in and intentional.
Fluted or reeded panels, glass-front doors – when to use
- Fluted or reeded panels work well on island cabinets or lower units to add subtle texture.
- Glass-front or frosted doors break up a solid row of wood and create visual interest while showing off curated dishware.
- Use glass sparingly—too many glass doors can feel cluttered.
Open shelving vs closed doors – pros and cons
- Open shelving feels airy and modern but requires neat organization.
- Closed cabinets hide clutter and give a more streamlined look.
- A mix of both can be the perfect compromise: open shelves for display, closed doors for storage.
For more real-life examples of how these textures and architectural details can change the look of your kitchen, I often reference Better Homes & Gardens – Warm Oak Cabinets Modernized. They showcase kitchens where subtle trim and glass panels completely update older wood cabinets.
Adding these details may seem small, but when combined with updated hardware, paint, and thoughtful lighting, your cabinets start to feel truly modern and intentionally designed.
Way 6 – Make smarter use of existing cabinets: open up, lighten up
Sometimes, the best way to modernize your cabinets isn’t to replace them—it’s to rethink how you use them. I’ve helped homeowners transform their kitchens by simply opening up spaces, adding light, and reimagining storage. These small changes can make your kitchen feel airy, modern, and completely refreshed.
Remove some upper doors to create open shelving
- Taking off a few cabinet doors instantly lightens the room and creates a display area.
- Use open shelves to showcase favorite dishes, glassware, or cookbooks.
- Keep styling minimal so it feels curated rather than cluttered.
Installing glass-front or frosted doors
- Glass-front doors add a designer touch while keeping things enclosed.
- Frosted glass offers a modern, sleek look without revealing clutter.
- Pair with interior cabinet lighting to highlight your items and create depth.
Updating interior cabinet finish and hardware
- A fresh interior finish—like painting the inside of cabinets a soft color—adds a subtle but noticeable upgrade.
- Swapping out old pulls and hinges inside the cabinets can make the whole piece feel new.
- Small details like this show thoughtfulness in your design, which elevates the kitchen. To maximize storage while keeping your kitchen clutter-free, I also recommend checking out 15 Expert‑Approved Kitchen Cabinet Tricks for Clutter‑Free Living—these tips show how small changes can make a big difference.
By making these smart, strategic updates, your cabinets can feel completely new without tearing anything out. It’s amazing what a little openness and thoughtful detailing can do.
Way 7 – Accessorise and style for the finishing touch
After you’ve updated hardware, paint, and layouts, the last step is about bringing personality and style to your cabinets. I always tell homeowners that styling is where your kitchen starts to feel like yours. Small details can make a big difference and really sell the transformation.
Trending cabinet styles (handleless, flat-panel, warm wood tones)
- Handleless cabinets: Sleek, minimalist, and perfect for modern kitchens.
- Flat-panel doors: Clean lines that work with any updated hardware or color scheme.
- Warm wood tones: Even a subtle refresh can make old cabinets feel inviting and contemporary.
Styling shelves and adding accent hardware
- Use open shelves to display ceramics, cookbooks, or small plants.
- Mixing metals (like brass pulls with black knobs) adds depth without feeling overdone.
- Small decorative touches—like lighting under shelves or stylish organizers—make the space feel curated.
Designer tips, social media post examples
- Check Instagram and Pinterest for trending layouts and styling ideas—seeing real kitchens in use helps you plan your own.
- Incorporate inspiration sparingly; you want your kitchen to feel personal, not like a copy of someone else’s.
- A few well-chosen accessories can make a huge visual impact.
For visual guidance, I recommend Pinterest kitchen cabinet boards. They show homeowners’ real-life examples of accessorized cabinets, styling tricks, and finishing touches that make spaces feel modern and lived-in.
Accessorising is the step where your hard work really shines. Once you’ve done this, your cabinets won’t just be updated—they’ll feel like a complete, stylish kitchen you’re proud to spend time in.
Way 8 – Maintenance and lifecycle planning
Updating your cabinets is exciting, but I always remind homeowners that keeping them looking fresh is just as important. I’ve seen people invest in beautiful finishes only to watch them fade because they didn’t maintain them properly. A little planning now saves you time, money, and frustration later.
Cleaning and protection tips
- Wipe spills immediately to prevent staining or warping.
- Use gentle cleaners specifically designed for wood or painted cabinets—avoid harsh chemicals that strip finishes. Wiping spills immediately and using gentle cleaners is crucial, but if you want a complete guide on cleaning wood cabinets without damaging them, check out 7 Simple Ways to Clean Wood Cabinets Without Damaging Them.
- For painted cabinets, a microfiber cloth with mild soap works best to avoid scratching.
When replacement may eventually be necessary
- Even with the best care, cabinets have a lifespan.
- Watch for sagging doors, warped frames, or water damage that updating can’t fix.
- Knowing the limits helps you budget for future renovations without surprises.
Small refreshes for long-term upkeep
- Swap hardware every few years to keep the look current.
- Touch up paint or stain in high-use areas to prevent visible wear.
- Rotate displayed items on open shelving to prevent sun fading and dust buildup.
By thinking ahead and caring for your cabinets properly, you can enjoy a modern, stylish kitchen for years without repeating a major renovation.
Final thoughts — getting it right for your space and budget
Updating your wood cabinets doesn’t have to be intimidating. By following these eight steps—hardware, finish, contrast, surrounding elements, texture, smart use, styling, and maintenance—you can completely transform your kitchen without a full remodel.
The key is to plan thoughtfully:
- Decide your style and color scheme before starting.
- Prioritize changes that fit your budget and timeline.
- Take small steps if needed—sometimes even just new hardware or a fresh coat of paint makes a huge difference.
I’d love to hear from you—what’s the first change you’re planning for your cabinets? Drop a comment below and share your ideas or questions.
And if you want more expert tips, guides, and step-by-step transformations, visit Build Like New. We show homeowners like you how to turn outdated spaces into modern masterpieces—without spending a fortune.
Disclaimer: Some updates may require professional help, and colors or finishes can vary depending on lighting and materials. Always follow product instructions when painting, staining, or cleaning cabinets.