
DIY Kitchen Upgrade: 10 Steps to a Perfect Garbage Disposal Installation
If you’ve ever stood in your kitchen with a sink full of food scraps and a drain that just won’t clear, you know how frustrating it feels. A garbage disposal solves that problem in minutes—but here’s the kicker: most people think they need to call a plumber and spend a couple hundred dollars for installation. The truth? You don’t.
I’ve seen countless homeowners handle this job themselves in less than an hour, even if they had zero experience with plumbing. And trust me, if you can tighten a few screws and follow simple steps, you can do this too. The best part is, you’ll not only save money but also gain the satisfaction of knowing you fixed an important part of your kitchen with your own hands.
In this guide, I’m going to walk you through 10 simple, practical steps to install a garbage disposal safely and correctly—without the stress, without the plumber, and without the guesswork. By the end, you’ll feel confident enough to tackle this project today.
Quick question before we dive in: Have you ever tried a DIY repair at home that actually saved you money? I’d love to know in the comments.
Safety First – Things to Do Before You Start
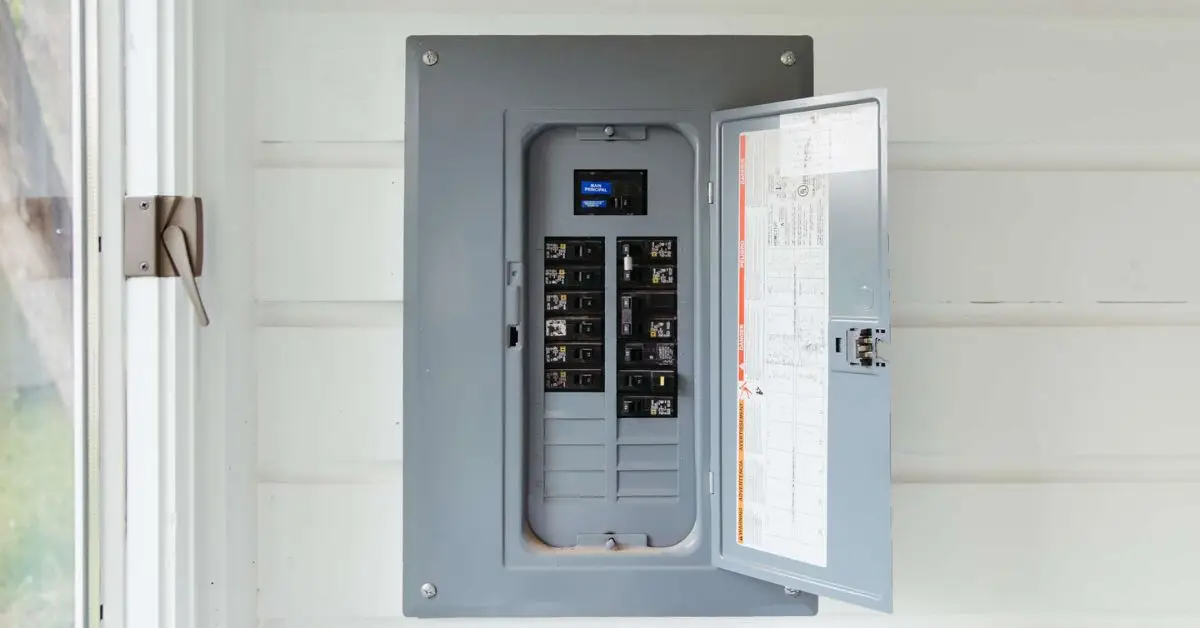
Before you even think about unboxing that shiny new garbage disposal, I need you to pause and take care of safety first. Trust me, skipping this step is where most DIY disasters happen. I’ve seen people rush in, only to end up with water all over the floor—or worse, a nasty electrical shock. You don’t want that.
Here’s what you should do right away:
- Turn off the circuit breaker that powers your kitchen outlet. Never assume it’s safe just because the switch is off.
- Shut off the water valve under your sink so you don’t get an unexpected flood while working.
- Put on gloves and goggles to protect your hands from sharp edges and your eyes from flying debris.
Nearly 30% of DIY electrical accidents happen because people forget to cut the power first. That’s a stat you don’t want to be a part of. Take two minutes now to do it right, and the rest of the job will go smoothly.
Tools and Materials You’ll Need
Once you’re safe, the next step is making sure you’ve got everything at arm’s reach. Nothing’s worse than being halfway under the sink and realizing you’re missing a wrench. I’ve been there, and it turns a one-hour job into a three-hour headache.
Here’s a simple checklist you can follow:
Tools:
- Screwdriver (both flathead and Phillips)
- Pliers
- Adjustable wrench
- Putty knife
- A small bucket or bowl (for catching water)
Materials:
- Garbage disposal unit (choose a model that matches your sink setup)
- Mounting ring
- Rubber gasket
- Plumber’s putty
- Drain pipe extension (if needed)
- Electrical cord (some units come pre-wired, some don’t)
If you’re unsure about which model or kit is best for your kitchen, big retailers like Lowe’s have helpful buying guides that break down the options clearly.
Having this list ready will save you time, stress, and a few trips back and forth to the hardware store. If you’re tackling DIY projects to improve functionality, you’ll also love these expert-approved kitchen cabinet tricks that help keep your cooking space clutter-free.
Step-by-Step Guide: How to Install a Garbage Disposal
Step 1 – Gather Tools and Materials
Before crawling under the sink, make sure everything you need is within reach. A missing tool mid-project can double your time.
You’ll need:
- Screwdriver (both flathead & Phillips)
- Adjustable wrench
- Pliers
- Putty knife (for scraping old sealant)
- Small bucket (to catch leftover water)
Materials:
- Garbage disposal unit
- Mounting ring + rubber gasket
- Plumber’s putty
- Drain pipe extension (if needed)
- Electrical cord (if your unit doesn’t come pre-wired)
Step 2 – Shut Off Power and Water Supply
This step is all about safety—you can’t afford to skip it.
- Go to your circuit breaker and turn off the kitchen’s power.
- Confirm by plugging in a lamp or small appliance to see if power is truly off.
- Shut the water valve under your sink to stop any surprise flooding.
Step 3 – Remove the Old Sink Strainer
If you already have an old strainer or disposal, it has to go before the new one goes in.
- Place the bucket under your sink to catch any water.
- Unscrew the nuts holding the strainer in place.
- Lift the strainer out from the top.
- Scrape away old putty or sealant with a putty knife until the sink opening is smooth.
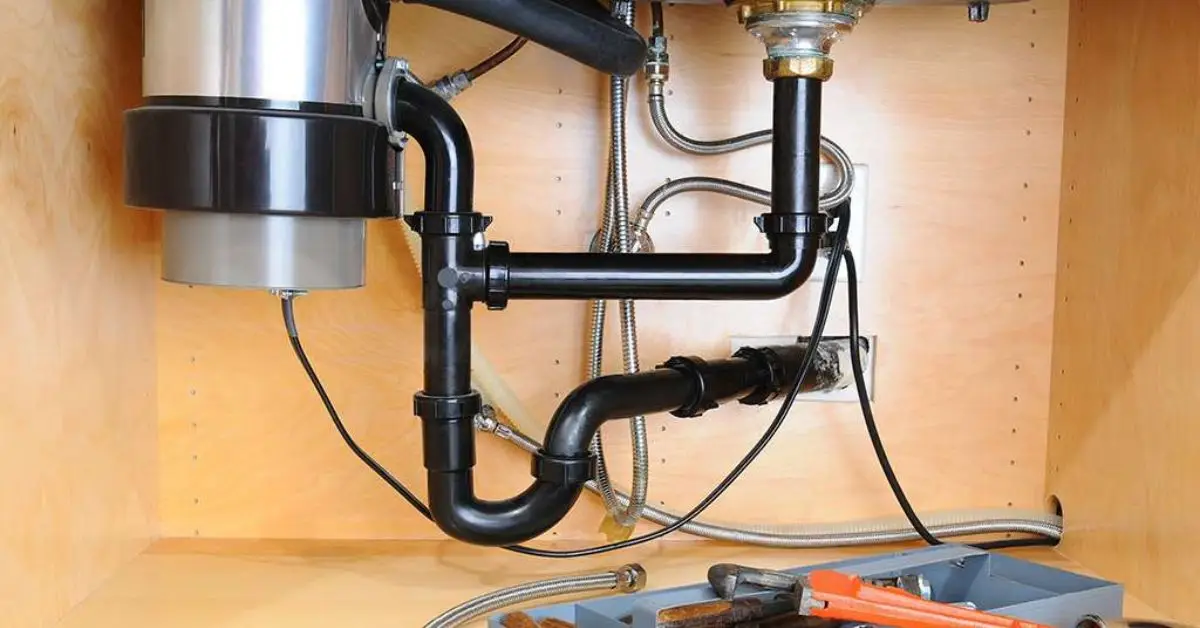
Step 4 – Install the Mounting Assembly
This creates the base for your disposal to sit on.
- Insert the mounting ring and gasket into the sink’s drain hole.
- Roll plumber’s putty into a rope shape and press it under the flange.
- Push the flange down into the sink opening.
- From underneath, tighten the screws evenly so the assembly sits flush.
Tip: Don’t overtighten; even pressure is key for preventing leaks.
Step 5 – Prepare the Garbage Disposal Unit
If your disposal doesn’t come pre-wired, now’s the time to set it up.
- Remove the unit’s wiring cover plate.
- Connect the hot (black), neutral (white), and ground (green/copper) wires securely.
- Use a clamp to hold the cord firmly in place.
- Replace the cover plate once connections are snug.
Step 6 – Mount the Disposal Under the Sink
Now comes the part most people get nervous about, but it’s easier than it looks.
- Lift the disposal and align it with the mounting ring.
- Twist it into place using the twist-and-lock method (like tightening a jar lid).
- Ensure it’s snug, but don’t overtighten. Overtightening can damage the mounting ring.
Step 7 – Connect the Discharge Tube
The disposal needs to connect to your home’s drainpipe.
- Attach the discharge tube to the disposal’s outlet.
- Connect the other end to the household drain line.
- Secure both ends with bolts or clamps.
- Wrap plumber’s tape around joints for extra leak protection.
Step 8 – Attach the Dishwasher Hose (If Needed)
If you have a dishwasher, it should drain through the disposal.
- Knock out the small plug inside the disposal’s inlet port.
- Slide the dishwasher hose over the port.
- Secure it tightly with a clamp.
Common mistake: Forgetting to remove the plug—your dishwasher won’t drain if you skip this.
Step 9 – Test the Installation
Now let’s make sure your hard work paid off.
- Fill the sink halfway with water.
- Release the water while the disposal is off → check for leaks.
- Turn the power back on at the breaker.
- Run the disposal for a few seconds.
- Listen: a smooth hum means it’s working, grinding sound means it’s ready.
If it hums but doesn’t spin → press the reset button at the bottom.
Step 10 – Maintain for Long-Term Performance
Installing the disposal is step one—keeping it running well is just as important.
- Always run cold water while grinding food.
- Avoid fibrous foods like celery, corn husks, or onion skins.
- Never put bones or hard shells inside.
- Monthly cleaning trick:
- Toss in a few ice cubes + lemon peels.
- Sprinkle baking soda.
- Run disposal with cold water → this sharpens blades and keeps smells away.
For a handy illustrated version of these steps, you can also check The Spruce’s guide while working alongside this tutorial.
Common Mistakes to Avoid
Even if you follow the steps carefully, there are a few slip-ups that can ruin the whole installation. I’ve seen homeowners make these mistakes again and again—but now you’ll know how to dodge them.
- Forgetting the dishwasher plug: If you don’t knock out the plug before connecting the hose, your dishwasher won’t drain.
- Skipping plumber’s putty: Without plumber’s putty around the sink flange, leaks are almost guaranteed.
- Overtightening screws: Cranking screws too tight can crack the mounting ring or warp the gasket. Always go for firm, even pressure.
Keep these in mind while working, and you’ll save yourself a ton of frustration later.
Quick Troubleshooting Guide

Even after a smooth install, disposals can act up sometimes. Don’t stress—most issues have quick fixes you can handle on your own.
- Disposal hums but doesn’t spin: This usually means it’s jammed. Switch it off, then press the reset button at the bottom. If needed, use an Allen wrench in the base slot to free the blades.
- Leaks under the sink: Most leaks come from loose seals or connections. Check the mounting ring, discharge tube, and dishwasher hose clamps.
- Bad smells: Lingering odors happen when food builds up. Drop in ice cubes and lemon peels, run with cold water, and it’ll smell fresh again.
These simple tricks will solve most problems in minutes—no plumber needed. And since you’re already working under the sink, don’t forget that your kitchen has other overlooked spots that collect bacteria—our guide on hidden germ havens in your kitchen shows you exactly where to clean next.
Cost Savings and Environmental Benefits
The other big win from installing a garbage disposal yourself? Saving money and helping the planet at the same time.
- Plumber installation: Typically costs $150–$300.
- DIY installation: Just the disposal unit, usually $100–$200.
- That’s instant savings of at least $50–$100.
On the eco side, disposals help cut down the amount of food waste that ends up in landfills, which in turn lowers harmful methane emissions. As explained by Happy Plumbing, garbage disposals can make a real difference in reducing greenhouse gases.
So by doing this one project yourself, you’re not just keeping money in your pocket—you’re also making a positive impact on the environment.
Final Thoughts – You Did It!
If you’ve made it this far, congratulations—you just installed your own garbage disposal without calling a plumber. That’s no small thing. Not only did you save money, but you also proved to yourself that you can take on a project many people shy away from. While upgrading your kitchen with a garbage disposal, it’s also worth looking at simple design upgrades like choosing the right cabinet hardware that can completely transform the space.
The best part? This is just the beginning. Once you’ve handled a project like this, other DIY jobs around the house won’t feel nearly as intimidating. You’ll look at your home differently—less like a set of problems, more like a place where you’re in control.
So go ahead and give yourself credit. You did it.
Your turn: Share your installation story or tips in the comments below—I’d love to hear how it went for you.
And if you want more practical DIY guides and home improvement tips, be sure to visit Build Like New for fresh ideas and step-by-step solutions.
Disclaimer: This guide is for general informational purposes only. Always follow the manufacturer’s instructions for your specific garbage disposal model. If you’re unsure or uncomfortable with electrical or plumbing work, consult a licensed professional.